
Matrix Code Rain in D3.js v6
January 15, 2021
I’ve been watching a lot of videos from Matrix Explained on YouTube (which is an awesome channel about theories within the Matrix movies) and it got me thinking how I could create the Matrix code rain in D3.js.
It was a fun project with some interesting challenges along the way. I learned a lot, which is why I want to share the journey with you.
I wanted to go at this blind, meaning I didn't want to look at anyone else's implementation of this. All I did was some simple Wikipedia research and watched the scene in The Matrix where Neo and Sipher are talking and looking at the matrix code.
By the way, I won't go into full detail regarding D3.js, but I'll do my best to explain each part so it will be easy to digest. I expect this post will be nice and short...
So where do we begin? First, let's define what we're trying to do:
- We need to define a grid (i.e. matrix) to place the letters in.
- The letters need to "fall" like raindrops. Each new letter needs to be below the last letter.
- The letters need to go through color phases:
- Super bright green
- Bright green
- Green
- Dark green
- Super dark green
- Then we delete it
- Speaking of colors, we need to figure out the color scheme.
- Since we'll be using D3.js, there will be a lot of DOM manipulation involved. We need to keep an eye out for any performance issues that might come up (you'll see).
Setting up the Container
We'll start with a fresh html doc where we include D3.js v6 (I'll be adding the svg element with JavaScript later):
<!DOCTYPE html>
<html>
  <head>
    <script src="https://d3js.org/d3.v6.min.js"></script>
  </head>
  <body></body>
</html>
Like the movie, we'll have our matrix fill up the entire viewable area. Let's add a simple set of CSS styles:
- Set the body's background to a very dark color with zero margins
- A container to hold the
svgelement and have the same background color- The reason for the body to have the same background as the container is to avoid any potential flickering between when the body is rendered and the
svgelement is added later with JavaScript.
- The reason for the body to have the same background as the container is to avoid any potential flickering between when the body is rendered and the
- And the size of the letters for the code rain
body {
  margin: 0;
  background-color: #0d0208;
}

.container {
  background-color: #0d0208;
  width: 100vw;
  height: 100vh;
}

.letter {
  font-size: 2em;
  font-family: Times;
}
Why font-family: Times;? Well, I used the default when I first built this on my Mac using Chrome and I wrote the entire post with this default (pictures and all) only to remember just now (as I edit this post) that different browsers may have different default fonts, so I'm back-filling this to keep everyone's experience consistent. And, honestly, the font doesn't look that bad.
Now, let's add the svg element and place a letter in there.
// first, lets get the container up and running
const svg = d3.select("body").append("svg").attr("class", "container");

// now, let's pick an arbitrary spot to put a letter in
const letter = svg
  .append("text")
  .attr("class", "letter")
  .attr("fill", "#dfdfdf")
  .attr("x", 100)
  .attr("y", 100)
  .text("a");

// adding these lines to show where the letter renders
const lineX = svg
  .append("line")
  .attr("stroke", "#ee0000")
  .attr("x1", 100)
  .attr("x2", 100)
  .attr("y1", 0)
  .attr("y2", 100);

const lineY = svg
  .append("line")
  .attr("stroke", "#ee0000")
  .attr("x1", 0)
  .attr("x2", 100)
  .attr("y1", 100)
  .attr("y2", 100);
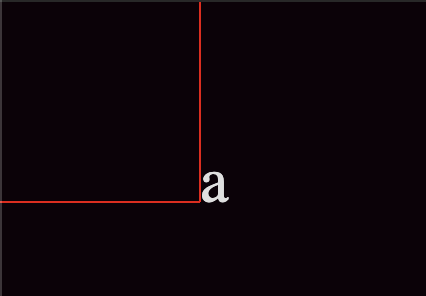
Here is the result so far. I added a couple of lines to show where the letter is rendered (this will be important later). Also, in the SVG container, the Y coordinates begin at the top of the element.
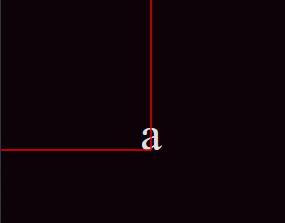
Because we're not using a fixed-width font, different characters can have different widths. Let's center the characters so they'll be aligned in each verticle line of the matrix. We can do this by adding a text-anchor attribute like so:
const letter = svg
  .append("text")
  .attr("class", "letter")
  .attr("text-anchor", "middle") // added this
  .attr("fill", "#dfdfdf")
  .attr("x", 100)
  .attr("y", 100)
  .text("a");
Defining the Character Set
According to this Wikipedia article about The Matrix code rain:
This code uses a custom typeface designed by Simon Whiteley, which includes mirror images of half-width kana characters and Western Latin letters and numerals.
I also went back to the original The Matrix movie scene where Neo talks with Cipher and asks him about the Matrix. In that scene, we get a peek at the Matrix code rain in action. From what I can tell, I couldn't see any Latin characters except mirrored numbers, so I excluded Latin letters from this project.
So we need the following:
- Half-width kana characters
- Western Latin numerals (0-9)
- The characters need to be mirrored
How do we get kana characters? Unicode. I found this site that has a great interface for this. If you're not familiar with unicode, it is a character encoding for lots of languages and alphabets and we can access them with JavaScript. Here is a site about unicode for more info.
Here are the unicode ranges that we'll use for this project:
- Basic Latin - in here, we just want the numbers 0 - 9, which is the range
0030 - 0039(or48 - 57in decimal, which I coded by hand since the range was so short). - Hiragana - there are 96 characters here (range 3040 - 309F), but oddly enough three of them are blank for me on my Mac using Chrome (3040, 3097, and 3098). I'm not going to worry about these, but I will exclude them from the set since I don't want blank characters.
- Katakana - with the range 30A0 - 30FF (and no missing characters for me here).
Unfortunately, the "half-width" part of the kana in our "spec" for this project is not in unicode. I did find this font that has half-width kana characters, but what's odd is that only very few characters are mirrored. So for this project/post, we'll just use whatever unicode has to offer and we'll mirror all characters we reference.
Let's define a function to get the character set that we'll use:
const getCharacterSet = () => {
  // start with 0 - 9
  const characters = [48, 49, 50, 51, 52, 53, 54, 55, 56, 57];

  // Hiragana
  // 3041— 309F
  const hiraganaMin = parseInt("3041", 16);
  const hiraganaMax = parseInt("309F", 16);

  for (let i = hiraganaMin; i <= hiraganaMax; i++) {
    characters.push(i);
  }

  // Katakana
  // 30A0— 30FF
  const katakanaMin = parseInt("30A0", 16);
  const katakanaMax = parseInt("30FF", 16);

  for (let i = katakanaMin; i <= katakanaMax; i++) {
    characters.push(i);
  }

  return characters;
};
Why use parseInt()? For two reasons:
- For the ranges of Hiragana and Katakana, it's easier to read the code if we fill in the array by incrementing a integer like we do here.
- We're going to use String.fromCodePoint() to get the character, where we can use an integer to reference the unicode character.
Let's put this new function to work. In our project, we're going to want to randomly get a new character for every character we want to render:
const charMap = getCharacterSet();

const getRandomCharacter = () => {
  const index = Math.floor(Math.random() * (charMap.length - 1));
  return String.fromCodePoint(charMap[index]);
};
Here's what all of the code looks like so far:
const svg = d3.select("body").append("svg").attr("class", "container");

const getCharacterSet = () => {
  // start with 0 - 9
  const characters = [48, 49, 50, 51, 52, 53, 54, 55, 56, 57];

  // Hiragana
  // 3041— 309F
  const hiraganaMin = parseInt("3041", 16);
  const hiraganaMax = parseInt("309F", 16);

  for (let i = hiraganaMin; i <= hiraganaMax; i++) {
    characters.push(i);
  }

  // Katakana
  // 30A0— 30FF
  const katakanaMin = parseInt("30A0", 16);
  const katakanaMax = parseInt("30FF", 16);

  for (let i = katakanaMin; i <= katakanaMax; i++) {
    characters.push(i);
  }

  return characters;
};

const charMap = getCharacterSet();

const getRandomCharacter = () => {
  const index = Math.floor(Math.random() * (charMap.length - 1));
  return String.fromCodePoint(charMap[index]);
};

// now, let's pick an arbitrary spot to put a letter in
const letter = svg
  .append("text")
  .attr("class", "letter")
  .attr("fill", "#dfdfdf")
  .attr("text-anchor", "middle")
  .attr("x", 100)
  .attr("y", 100)
  .text(getRandomCharacter());

const lineX = svg
  .append("line")
  .attr("stroke", "#ee0000")
  .attr("x1", 100)
  .attr("x2", 100)
  .attr("y1", 0)
  .attr("y2", 100);

const lineY = svg
  .append("line")
  .attr("stroke", "#ee0000")
  .attr("x1", 0)
  .attr("x2", 100)
  .attr("y1", 100)
  .attr("y2", 100);
Each time we refresh the page, a new character comes up:

Great. This is really starting to come together. See? This post isn't so long, right?
Mirroring the Letters
Now, let's implement this part of the text "spec," if you will, which is to mirror the text.
How do we do that? With scale transform.
Since we only have to mirror along the X axis, we will update our text attribute to have a transform attribute to scale along the X axis and apply a negative value:
const letter = svg
  .append("text")
  .attr("class", "letter")
  .attr("fill", "#dfdfdf")
  .attr("text-anchor", "middle")
  .attr("transform", "scale(-1, 1)") // added this
  .attr("x", 100)
  .attr("y", 100)
  .text(getRandomCharacter());
Which produces this:
...and it's gone...
Wait, wait. I clearly forgot something. Let's head to the docs.
OK, if we refer to this image from MDN:

We can see that the scale transform will multiply the scale's value to the specific X or Y values you have in the attributes. So, if we apply a negatvie value for the scale, it will mirror the object and place it in the negative area of that axis. And since the SVG container right now is only displaying elements in the positive X and Y coordinates, we can't see the element anymore.
If we update the viewBox attribute on our svg element to -200 0 400 400 like this:
const svg = d3
  .select("body")
  .append("svg")
  .attr("class", "container")
  // add the viewBox temporarily to show where the letter ended up
  .attr("viewBox", "-200 0 400 400");
We'll see that the character is to the far left (in the negative area of the X axis):

Since we applied a transform to scale the x value with -1, instead of our character ending up in x:100, it ended up in x:-100. To invert this, we just have to negate our x attribute value like so:
const letter = svg
  .append("text")
  .attr("class", "letter")
  .attr("fill", "#dfdfdf")
  .attr("text-anchor", "middle")
  .attr("transform", "scale(-1, 1)")
  .attr("x", -100) // changed from 100 to -100
  .attr("y", 100)
  .text(getRandomCharacter());
Now when the scale(-1, 1) transform is applied, it will take the -100 and turn it into 100 (effectively - you're not going to see the DOM element's x attribute become 100, it will stay at -100) and the character will be placed in the right position (I'll also remove our temporary viewBox attribute on the svg element):
(btw, it's a different character because I refreshed the page)
Great, we're back on track.
Defining the Matrix
OK, now that we can get a random letter, and it's mirrored, let's figure out where and how to place them in a grid-like way.
To make a grid, we need to figure out how to break up our SVG container into little rectangles so we can place our text in them.
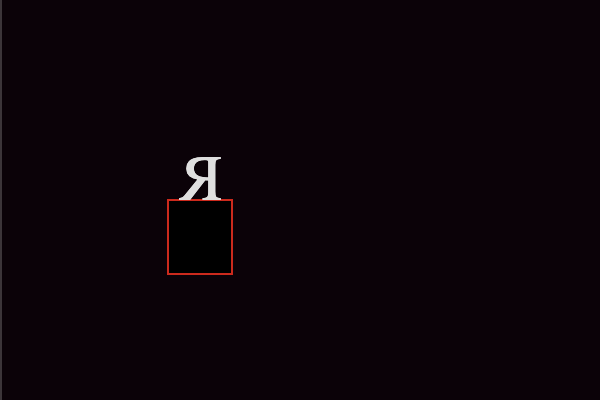
After some testing, I noticed that most (if not all) of the kana characters in the unicode were the same size. We'll use this as a reference for all text elements:
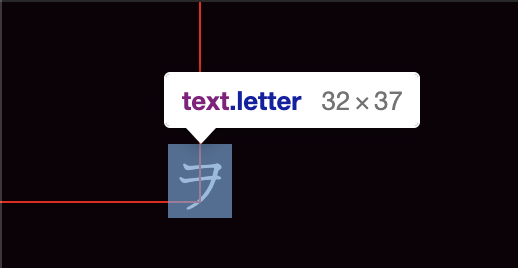
That's 32w x 37h. So we'll break up the available space into 32x37 rectangles.
First, we'll need to get the current size of the svg element. Since we're using viewport units, we need to get the bounding client rectangle of the element.
let svgSize = svg.node().getBoundingClientRect();
In order to divide up the SVG area, we'll need to store the character size we want to set.
const charSize = {
  width: 32,
  height: 37,
};
We're going to use an array of arrays here. Normally, I think of the first dimension of the array to be the row, and the second dimension to be the column. However, for this project I will be inverting that - only because traversing the array will be easier. The idea is to pick a column, and then run through the rows adding letters until we finish the column.
Here's a visual way to think about this with a 3x3 matrix:
      Column0   Column1   Column2
Row0  [0][0]    [1][0]    [2][0]
Row1  [0][1]    [1][1]    [2][1]
Row2  [0][2]    [1][2]    [2][2]
In order to get the amount of columns and rows for the grid, we have to divide the SVG width and height by the character width and height. Then we'll store the position for each rectangle in the second dimension of the array:
const getMatrix = () => {
  let columns = Math.ceil(svgSize.width / charSize.width);
  let rows = Math.ceil(svgSize.height / charSize.height);
  const matrix = [];

  for (let column = 0; column < columns; column++) {
    matrix[column] = [];
    let columnPosition = column * charSize.width;

    for (let row = 0; row < rows; row++) {
      let rowPosition = row * charSize.height;
      matrix[column][row] = {
        x: columnPosition,
        y: rowPosition,
      };
    }
  }

  return matrix;
};
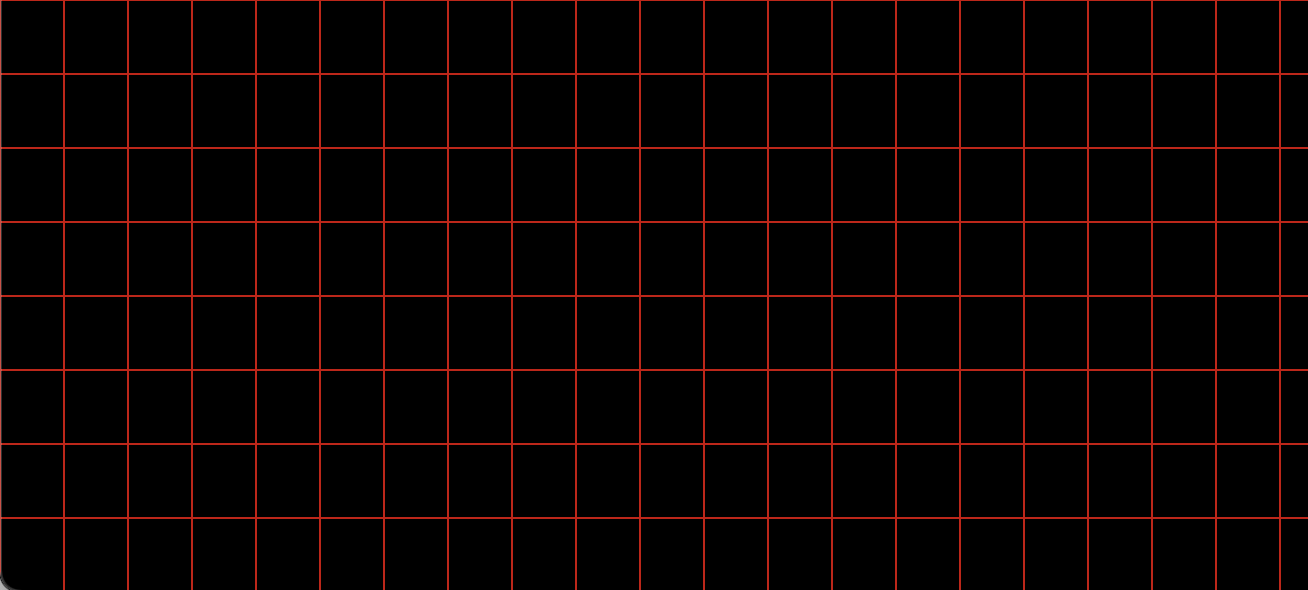
Finally, let's put the rectangles in the svg element and see how it renders:
let matrix = getMatrix();

for (let column = 0; column < matrix.length; column++) {
  for (let row = 0; row < matrix[column].length; row++) {
    let position = matrix[column][row];

    svg
      .append("rect")
      .attr("stroke", "#c00")
      .attr("x", position.x)
      .attr("y", position.y)
      .attr("width", charSize.width)
      .attr("height", charSize.height);
  }
}
Here's how it rendered for me:
Now let's update the loop to include the letters:
for (let column = 0; column < matrix.length; column++) {
  for (let row = 0; row < matrix[column].length; row++) {
    let position = matrix[column][row];
    svg
      .append("rect")
      .attr("stroke", "#c00")
      .attr("x", position.x)
      .attr("y", position.y)
      .attr("width", charSize.width)
      .attr("height", charSize.height);

    svg
      .append("text")
      .attr("class", "letter")
      .attr("fill", "#dfdfdf")
      .attr("text-anchor", "middle")
      .attr("transform", "scale(-1, 1)")
      .attr("x", -position.x)
      .attr("y", position.y)
      .text(getRandomCharacter());
  }
}
And let's see what happens.
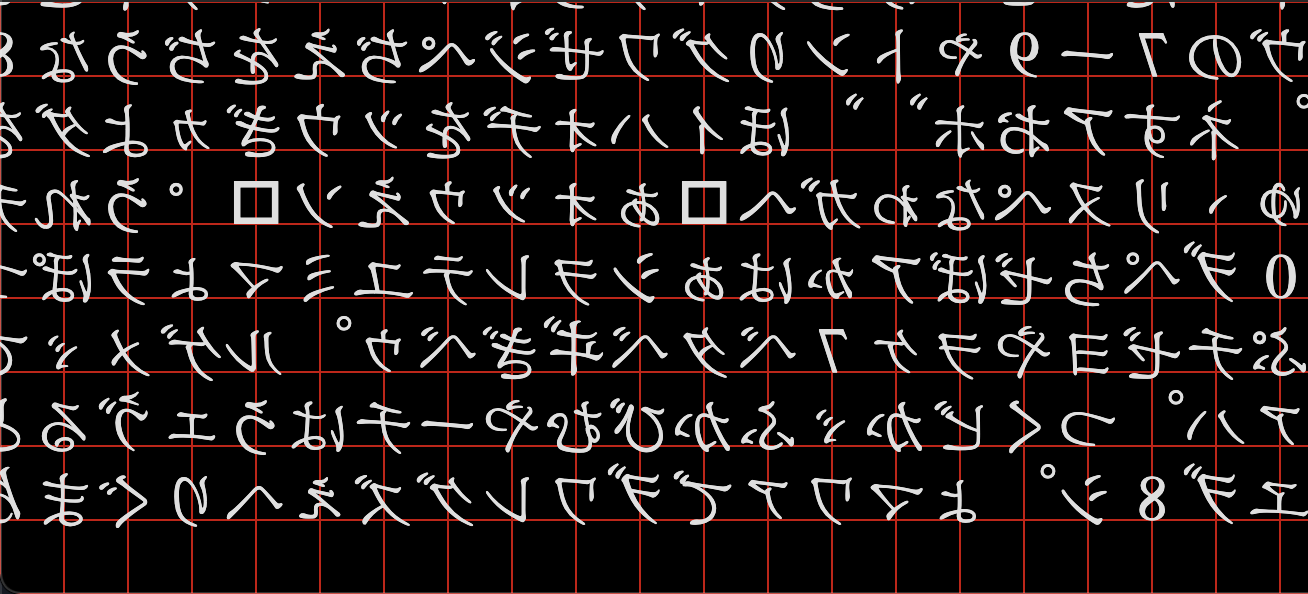
Whoops! The letters are not aligning with the rectangles. Let's fix that.
I swear this post won't take much longer.
Fixing the Alignment Issue
We'll start with a simple rectangle and mirrored letter:
const svg = d3.select("body").append("svg").attr("class", "container");

svg
  .append("rect")
  .attr("stroke", "#d00")
  .attr("x", 100)
  .attr("y", 100)
  .attr("width", 32)
  .attr("height", 37);

svg
  .append("text")
  .attr("class", "letter")
  .attr("fill", "#dfdfdf")
  .attr("transform", "scale(-1, 1)")
  .attr("x", -100)
  .attr("y", 100)
  .text("R");
Which renders:
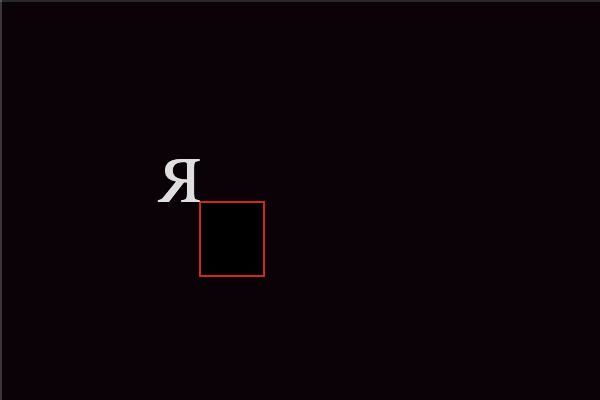
Notice how the text starts at 100, 100 and is rendered to the left? That's because of the negative scaling we applied to it in order to mirror the text.
Let's center the text:
svg
  .append("text")
  .attr("class", "letter")
  .attr("fill", "#dfdfdf")
  .attr("transform", "scale(-1, 1)")
  .attr("text-anchor", "middle") // added
  .attr("x", -100)
  .attr("y", 100)
  .text("R");
Which shifts the text slightly:

Remember, we want to center the text because in a column, we want to have all the letters aligned.
Now, let's shift the letter half its width to center it to the rectangle:
svg
  .append("text")
  .attr("class", "letter")
  .attr("fill", "#dfdfdf")
  .attr("transform", "scale(-1, 1)")
  .attr("text-anchor", "middle")
  .attr("x", -100 - 32 / 2) // updated
  .attr("y", 100)
  .text("R");
So now the text is aligned with the middle of the rectangle:
Finally, let's adjust the text dominant baseline (I don't know much about this and I'll probably discuss this in another post later on after I've learned more about it).
svg
  .append("text")
  .attr("class", "letter")
  .attr("fill", "#dfdfdf")
  .attr("transform", "scale(-1, 1)")
  .attr("text-anchor", "middle")
  .attr("dominant-baseline", "text-before-edge") // added
  .attr("x", -100 - 32 / 2)
  .attr("y", 100)
  .text("R");
Which finally renders:

Perfect.
Let's apply this to our main code base (we'll just fix up our double for loop):
for (let column = 0; column < matrix.length; column++) {
  for (let row = 0; row < matrix[column].length; row++) {
    const position = matrix[column][row];
    svg
      .append("rect")
      .attr("stroke", "#c00")
      .attr("x", position.x)
      .attr("y", position.y)
      .attr("width", charSize.width)
      .attr("height", charSize.height);

    svg
      .append("text")
      .attr("class", "letter")
      .attr("fill", "#dfdfdf")
      .attr("text-anchor", "middle")
      .attr("dominant-baseline", "text-before-edge")
      .attr("transform", "scale(-1, 1)")
      .attr("x", -position.x - charSize.width / 2)
      .attr("y", position.y)
      .text(getRandomCharacter());
  }
}
Drum roll, please...
Awesome.
By the way, this is how I like to approach all problems with coding: break it down into bite-sized pieces and work through the problem one code update at a time. I don't recommend making 50 updates all at once and then see where you end up. I'll probably discuss this way of solving problems in another post later on. My general recommendation is to iterate over the problem and keep the feedback loop short.
Make it Rain
Alright, since this post is super short, we have plenty of room to work on the next part. (btw, are you still reading this? I know I am)
If you noticed, the way we go through the array of arrays is such that:
- We go through each column
- Iterate through all of the rows, placing letters along the way
- When we finish the rows for the column, we move on to the next column
But it happens so fast, we don't see it work out that way. We'll need a way to wait ever so slightly before we render each character. So, we're going to break up the double for loop into smaller parts to have more control over what happens.
First, let's make a function out of the portion that adds a random character to the matrix we created:
const placeText = (character, position) => {
  svg
    .append("rect")
    .attr("stroke", "#c00")
    .attr("x", position.x)
    .attr("y", position.y)
    .attr("width", charSize.width)
    .attr("height", charSize.height);

  svg
    .append("text")
    .attr("class", "letter")
    .attr("fill", "#dfdfdf")
    .attr("text-anchor", "middle")
    .attr("dominant-baseline", "text-before-edge")
    .attr("transform", "scale(-1, 1)")
    .attr("x", -position.x - charSize.width / 2)
    .attr("y", position.y)
    .text(character);
};
Next, we'll create a function that creates a raindrop. A raindrop will do the following:
- Pick a random column
- Render characters in that column
- When it finishes going through the rows, pick a new column and start over
const rainDrop = () => {
  // first, pick a random column
  let column = Math.floor(Math.random() * matrix.length);
  // setup a counter for the rows
  let row = 0;

  // return a function which, when run, places the text in the next
  // spot until it finishes
  return () => {
    const char = getRandomCharacter();
    const position = matrix[column][row];
    placeText(char, position);
    row++;

    // if we went through all of the rows, pick a new column
    // and start over
    if (row >= matrix[column].length) {
      column = Math.floor(Math.random() * matrix.length);
      row = 0;
    }
  };
};
Here, we've taken advantage of closures which allows us to setup the raindrop and ever time we invoke the returned function, it has its own local state of the column and row its working on. A nice feature of this is that you can call the function indefinitely without having to worry if it will run out of bounds on the matrix array and you don't need to be notified if it finished.
Finally, we need to make it look like the raindrop is falling. Here, we'll use d3.interval to continuously call the rainDrop local variable.
const rainDrop1 = rainDrop();
d3.interval(rainDrop1, 100);
Here's the output so far:
Not bad. There are some issues to note, though:
- The same column gets repeated a little too often.
- The letters cover up the previous letter, which is not what we see if we inspect the Matrix code in the movie (the scene where Neo and Sipher talk).
- The code is not cleaning up old
<text>elements and it's filling up the DOM like crazy, which will eventually cause the browser tab to crash (trust me on this). This is one of the performance issues I alluded to earlier.
You might also be asking, why use d3.interval instead of setInterval? This is because setInterval will continue running even if you change tabs, which we don't want in this case. It would fill up the DOM while we're not looking and you'll just be draining the battery on someone's device for no reason.
Let's fix these items up.
Stop Repeating Columns
What we should do is change our code from randomly selecting a column to shuffling the columns to use so we don't repeat any (at least, until we've run through all of them).
We'll use the Fisher-Yates Shuffle algorithm, with the implementation I found on javascript.info (a great resource, by the way).
const shuffle = (array) => {
  for (let i = array.length - 1; i > 0; i--) {
    let j = Math.floor(Math.random() * (i + 1));
    [array[i], array[j]] = [array[j], array[i]];
  }
  return array;
};
Now let's update our rainDrop function to use this new shuffle function in order to fill up the matrix:
const rainDrop = () => {
  // get the matrix column indices as an array of strings to shuffle
  let shuffledColumns = Object.keys(matrix);
  shuffle(shuffledColumns);
  let shuffledIndex = 0;

  let column = shuffledColumns[shuffledIndex];
  let row = 0;

  // return a function which, when run, places the text in the next
  // spot until it finishes
  return () => {
    const char = getRandomCharacter();
    const position = matrix[column][row];
    placeText(char, position);
    row++;

    // if we went through all of the rows, pick a new column
    // and start over
    if (row >= matrix[column].length) {
      shuffledIndex++;

      // if we went through all columns, shuffle them again
      if (shuffledIndex >= shuffledColumns.length) {
        shuffle(shuffledColumns);
        shuffledIndex = 0;
      }

      // pick the next column and reset the row
      column = shuffledColumns[shuffledIndex];
      row = 0;
    }
  };
};
To the seasoned devs out there, this might look a little verbose - that's on purpose. I want to keep this code as clear as possible. In my opinion, it's better to be clear than to be clever.
Here's the output of this fix:
Much better. Let's move on.
Allow Text to Be "Overwritten"
Why does the new text completely cover the old text when they're rendered in the same spot? When a rect element is added, it has a default fill of #000 (black). So when a new character comes in on at the same position as a previous one, the new text is shown on top of the old (this is also because the element is appended to the end of the DOM list, which will render the new rectangle on top of the old one).
Since we don't need the rectangle and outline anymore, let's just remove it altogether. We'll update the placeText function to be:
const placeText = (character, position) => {
  svg
    .append("text")
    .attr("class", "letter")
    .attr("fill", "#dfdfdf")
    .attr("text-anchor", "middle")
    .attr("dominant-baseline", "text-before-edge")
    .attr("transform", "scale(-1, 1)")
    .attr("x", -position.x - charSize.width / 2)
    .attr("y", position.y)
    .text(character);
};
And here's the output of this fix (also, I sped up how fast the letters are placed in the matrix):
We'll make this look prettier in a bit.
Cleaning Up the DOM
We don't want to inflate the DOM to the point of crashing the browser. And later in the post, we'll discuss how to animate things so this looks nicer.
For now, we'll put some code in place to have the element remove itself after a specific amount of time. We'll make another adjustment to the placeText function:
const placeText = (character, position) => {
  const letter = svg
    .append("text")
    .attr("class", "letter")
    .attr("fill", "#dfdfdf")
    .attr("text-anchor", "middle")
    .attr("dominant-baseline", "text-before-edge")
    .attr("transform", "scale(-1, 1)")
    .attr("x", -position.x - charSize.width / 2)
    .attr("y", position.y)
    .text(character);

  d3.timeout(() => letter.remove(), 2000);
};
Here's we've assigned the text element to a variable letter and told d3 that we want to remove it from the DOM after 2 seconds.
That looks alright, but we're going to want to have them disappear a little more randomly, so we'll update the timeout to randomly select a time between 2 seconds and 7 seconds:
d3.timeout(() => letter.remove(), Math.floor(Math.random() * 5000) + 2000);
That's better.
You might notice that if we don't have the correct balance of adding and removing text, we could inadvertently fill up the DOM (or if we're too aggressive with removing the text, we could blank out most of the real estate).
We're going to want to safeguard ourselves in the case of overfilling the DOM. Let's add a little more code for that:
const removeExtraTextElements = () => {
  const maxVisibleChars =
    (svgSize.width * svgSize.height) / (charSize.width * charSize.height);
  const maxVisibleCharsAllowed = Math.floor(maxVisibleChars * 0.7); // 70% of the area

  const elements = document.getElementsByTagName("text");
  const leftoverDomCount = elements.length - maxVisibleCharsAllowed;

  if (leftoverDomCount > 0) {
    console.log(`extra elements found - ${leftoverDomCount}`);
    for (let i = 0; i < leftoverDomCount; i++) {
      elements[i].remove();
    }
  }
};

d3.interval(removeExtraTextElements, 500);
You can inspect the dev console to see how many elements need to be removed while this runs.
The Animatrix Animations
Finally, let's get into the animations. This post isn't that long, right? This is easily a 3 min read, tops. Anyways, let's "make it pop."
For the colors, I used this site as a reference. Here's what I landed on:
- Super Bright Green: #E6FFEC
- Bright Green: #00FF41
- Green: #008F11
- Dark Green: #003B00
- Super Dark Green: #002300
Where:
- Super bright green will flash real quick
- Bright green will stay for a bit
- Green will stay for a bit
- Dark green will stay for a bit
- Super dark green will stay until the character is removed
We'll be using D3.js's transition method to go from one color to the next, along with d3.timeout to specify when they go from phase to phase.
I'll add the colors to the top of the script block:
const colors = {
  superBrightGreen: "#E6FFEC",
  brightGreen: "#00FF41",
  green: "#008F11",
  darkGreen: "#003B00",
  superDarkGreen: "#002300",
};
The placeText function needs to be updated to include the new color when we first place the text, so we'll do that. Also, earlier, we added a line that removed the text after a specific period of time. This doesn't follow the Single Responsibility principle of SOLID programming. Instead, we'll remove that part and just return the letter to the calling function and let another function take care of removing the element from the DOM.
We are also adding an opacity attribute because that's how we'll make it fade away before deleting it.
const placeText = (character, position) => {
  const letter = svg
    .append("text")
    .attr("class", "letter")
    .attr("fill", colors.superBrightGreen) // updated
    .attr("opacity", 1) // added
    .attr("text-anchor", "middle")
    .attr("dominant-baseline", "text-before-edge")
    .attr("transform", "scale(-1, 1)")
    .attr("x", -position.x - charSize.width / 2)
    .attr("y", position.y)
    .text(character);

  return letter; // added
};
Now let's add all of the transition animations, along with removing the text at the end of its lifecycle:
const animateText = (letter) => {
  letter
    .transition()
    .duration(100)
    .attr("fill", colors.brightGreen)
    .transition()
    .duration(10)
    .attr("fill", colors.green);

  d3.timeout(() => {
    letter.transition().duration(750).attr("fill", colors.darkGreen);
  }, Math.floor(Math.random() * 3000));

  d3.timeout(() => {
    letter.transition().duration(750).attr("fill", colors.superDarkGreen);
  }, Math.floor(Math.random() * 4000));

  d3.timeout(() => {
    letter.transition().duration(750).attr("opacity", 0).remove();
  }, Math.floor(Math.random() * 10000));
};
Now, let's tie them together in the rainDrop method. We're also going to make another update to this method where we'll randomly pick the starting row. We'll choose somewhere in the top 30% of the area.
const rainDrop = () => {
  let shuffledColumns = Object.keys(matrix);
  shuffle(shuffledColumns);
  let shuffledIndex = 0;

  let column = shuffledColumns[shuffledIndex];

  // added
  const getRandomStartingRow = () => {
    const maxRows = matrix[0].length;
    return Math.floor(Math.random() * Math.ceil(maxRows * 0.3));
  };

  let row = getRandomStartingRow(); // updated

  return () => {
    const char = getRandomCharacter();
    const position = matrix[column][row];
    const letter = placeText(char, position);
    animateText(letter);
    row++;

    if (row >= matrix[column].length) {
      shuffledIndex++;

      if (shuffledIndex >= shuffledColumns.length) {
        shuffle(shuffledColumns);
        shuffledIndex = 0;
      }

      column = shuffledColumns[shuffledIndex];
      row = getRandomStartingRow(); // updated
    }
  };
};
Finally, we'll add more raindrops and have them begin their rending at different offsets and speeds:
const rainDrop1 = rainDrop();
const rainDrop2 = rainDrop();
const rainDrop3 = rainDrop();

d3.interval(rainDrop1, Math.floor(100 + Math.random() * 50));
d3.interval(rainDrop2, Math.floor(100 + Math.random() * 100));
d3.interval(rainDrop3, Math.floor(100 + Math.random() * 150));
Let's see how this panned out:
Nice.
A word of caution, this is very resource intensive. I wouldn't recommend running this on a phone or a laptop using its battery. That said, here's the full code:
<!DOCTYPE html>
<html>
  <head>
    <style>
      body {
        margin: 0;
        background-color: #0d0208;
      }

      .container {
        background-color: #0d0208;
        width: 100vw;
        height: 100vh;
      }

      .letter {
        font-size: 2em;
        font-family: Times;
      }
    </style>
    <script src="https://d3js.org/d3.v6.min.js"></script>
  </head>
  <body>
    <script>
      const colors = {
        superBrightGreen: "#E6FFEC",
        brightGreen: "#00FF41",
        green: "#008F11",
        darkGreen: "#003B00",
        superDarkGreen: "#002300",
      };

      const getCharacterSet = () => {
        // start with 0 - 9
        const characters = [48, 49, 50, 51, 52, 53, 54, 55, 56, 57];

        // Hiragana
        // 3041— 309F
        const hiraganaMin = parseInt("3041", 16);
        const hiraganaMax = parseInt("309F", 16);

        for (let i = hiraganaMin; i <= hiraganaMax; i++) {
          characters.push(i);
        }

        // Katakana
        // 30A0— 30FF
        const katakanaMin = parseInt("30A0", 16);
        const katakanaMax = parseInt("30FF", 16);

        for (let i = katakanaMin; i <= katakanaMax; i++) {
          characters.push(i);
        }

        return characters;
      };

      const svg = d3.select("body").append("svg").attr("class", "container");

      let svgSize = svg.node().getBoundingClientRect();

      const charSize = {
        width: 32,
        height: 37,
      };

      const charMap = getCharacterSet();

      const getRandomCharacter = () => {
        const index = Math.floor(Math.random() * (charMap.length - 1));
        return String.fromCodePoint(charMap[index]);
      };

      const shuffle = (array) => {
        for (let i = array.length - 1; i > 0; i--) {
          let j = Math.floor(Math.random() * (i + 1));
          [array[i], array[j]] = [array[j], array[i]];
        }
        return array;
      };

      const placeText = (character, position) => {
        const letter = svg
          .append("text")
          .attr("class", "letter")
          .attr("fill", colors.superBrightGreen)
          .attr("opacity", 1)
          .attr("text-anchor", "middle")
          .attr("dominant-baseline", "text-before-edge")
          .attr("transform", "scale(-1, 1)")
          .attr("x", -position.x - charSize.width / 2)
          .attr("y", position.y)
          .text(character);

        return letter;
      };

      const animateText = (letter) => {
        letter
          .transition()
          .duration(100)
          .attr("fill", colors.brightGreen)
          .transition()
          .duration(10)
          .attr("fill", colors.green);

        d3.timeout(() => {
          letter.transition().duration(750).attr("fill", colors.darkGreen);
        }, Math.floor(Math.random() * 3000));

        d3.timeout(() => {
          letter.transition().duration(750).attr("fill", colors.superDarkGreen);
        }, Math.floor(Math.random() * 4000));

        d3.timeout(() => {
          letter.transition().duration(750).attr("opacity", 0).remove();
        }, Math.floor(Math.random() * 10000));
      };

      const getMatrix = () => {
        let columns = Math.ceil(svgSize.width / charSize.width);
        let rows = Math.ceil(svgSize.height / charSize.height);
        const matrix = [];

        for (let column = 0; column < columns; column++) {
          matrix[column] = [];
          let columnPosition = column * charSize.width;

          for (let row = 0; row < rows; row++) {
            let rowPosition = row * charSize.height;
            matrix[column][row] = {
              x: columnPosition,
              y: rowPosition,
            };
          }
        }

        return matrix;
      };

      let matrix = getMatrix();

      const rainDrop = () => {
        // get the matrix column indices as an array of strings to shuffle
        let shuffledColumns = Object.keys(matrix);
        shuffle(shuffledColumns);
        let shuffledIndex = 0;

        let column = shuffledColumns[shuffledIndex];
        const getRandomStartingRow = () => {
          const maxRows = matrix[0].length;
          return Math.floor(Math.random() * Math.ceil(maxRows * 0.3));
        };

        let row = getRandomStartingRow();

        // return a function which, when run, places the text in the next
        // spot until it finishes
        return () => {
          const char = getRandomCharacter();
          const position = matrix[column][row];
          const letter = placeText(char, position);
          animateText(letter);
          row++;

          // if we went through all of the rows, pick a new column
          // and start over
          if (row >= matrix[column].length) {
            shuffledIndex++;

            // if we went through all columns, shuffle them again
            if (shuffledIndex >= shuffledColumns.length) {
              shuffle(shuffledColumns);
              shuffledIndex = 0;
            }

            // pick the next column and reset the row
            column = shuffledColumns[shuffledIndex];
            row = getRandomStartingRow();
          }
        };
      };

      const removeExtraTextElements = () => {
        const maxVisibleChars =
          (svgSize.width * svgSize.height) / (charSize.width * charSize.height);
        const maxVisibleCharsAllowed = Math.floor(maxVisibleChars * 0.7);

        const elements = document.getElementsByTagName("text");
        const leftoverDomCount = elements.length - maxVisibleCharsAllowed;

        if (leftoverDomCount > 0) {
          console.log(`extra elements found - ${leftoverDomCount}`);
          for (let i = 0; i < leftoverDomCount; i++) {
            elements[i].remove();
          }
        }
      };

      d3.interval(removeExtraTextElements, 500);

      const rainDrop1 = rainDrop();
      const rainDrop2 = rainDrop();
      const rainDrop3 = rainDrop();

      d3.interval(rainDrop1, Math.floor(100 + Math.random() * 50));
      d3.interval(rainDrop2, Math.floor(100 + Math.random() * 100));
      d3.interval(rainDrop3, Math.floor(100 + Math.random() * 150));
    </script>
  </body>
</html>
Performance Issues
There are definitely performance issues here. It might be because of all of the constant DOM manipulation, or maybe there are too many timeout and interval functions being created because they are anonymous functions. Or maybe it's both of those things and more.
Either way, the main point of this post was to show you how to tackle the task, and how to adjust to problems along the way. If you made it this far, thank you for reading all of it (or at least scrolling to the bottom to check out the final product). I told you this was a super short post!