Windows 3.1 Flying Windows Screensaver in THREE.js
May 25, 2021
Remember the "flying windows" screensaver from the 90s? I remember it from my elementary school. I also remember the pipes screensaver around the same time. They were both mesmerizing. For the pipes screensaver, I was always waiting to see when the computer figured out that the screen was "filled up" with pipes and cleared the screen to start over. And with the flying windows screensaver, I was always waiting for one of the flying windows to fly right through the middle, though it never did.
Anyway, I thought it would be fun to recreate this classic screensaver from Windows 3.1 using JavaScript and THREE.js because...why not?
I haven't done any 3D rendering before nor have I used the THREE.js library and this was a nice opportunity to learn something new. And, hey, it's also content for this site, so there's that.
This post is more about the thought process of solving this problem than it is a tutorial about THREE.js. However, since I did end up solving this with THREE.js, I include the code and all my source material that helped me get here.
This is by no means the right way to do this, but it's one way. I'm sure there are plenty of improvements that could be made, but the result is close enough for what I was looking for.
Research
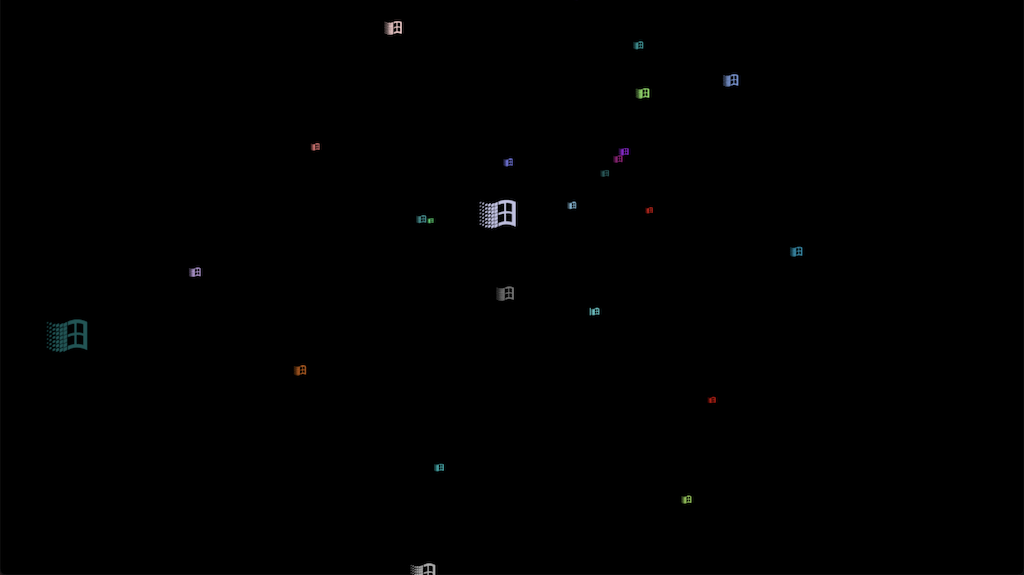
This part was simple. All I did for research was look on YouTube for "flying windows screensaver" and came across this one.
From there, I just studied the video and took some notes:
- The "flying windows" logos are all the same shape, just different colors
- All of the windows move at the same speed
- All of the windows move in the same direction (toward the camera)
- None of the windows rotate on any axis
- None of the windows go directly at the camera
- Actually, if one does get close, it looks as if the window is "pushed" away from the center
- The windows are randomly placed
- The windows are randomly colored and each have a uniform color (unlike the Windows 3.1 logo)
Iterating Each Approach
2D or 3D?
At first, I thought about doing this in 2D. I have more experience with 2D apps (and none in 3D) and I figured since the windows are 2D, why not just go with a 2D option?
So my first thought was to attempt this in D3.js since I have experience there.
D3.js?
If we were to do this in D3.js, how would that work? Here's the mental model I came up with:
- Create the canvas
- Get an SVG file for the window logo in the screensaver
- Randomly place each window inside the canvas with random:
- X and Y coordinates
- Random size (smaller = further away, giving the "appearance" of 3D)
- Constantly update all of the DOM elements to create the perception of 3D windows flying at you
- This means coming up with an algorithm that will move the windows along the X and Y axis and making the object bigger and out of the way when it gets "close" to the "camera".
- After each window is out of the canvas area, either delete the node and create a new one, or reposition it again
While this could work, I came across some issues when prototyping:
- Constant DOM manipulation is very taxing on the browser and the performance (and your battery)
- If we keep creating nodes and deleting them (when the windows leave the view), there's even more work for the browser to do and our memory usage will go up and down as the garbage collector cycles
- The calculation for each object to make the appearance of 3D movement seems overly complex for what we're trying to do
By the way, after writing this post, I ended up finding some 3D libraries that build on top of D3.js, but it was already too late - I had already written this app with THREE.js by that point.
WebGL?
I haven't written anything involving WebGL before, but a natural 3D rendering engine (as opposed to creating the appearance of 3D) felt like the right choice for the following reasons:
- All we need to do is to move items along the Z-axis and the engine takes care of rendering how the objects look for us
- There's no DOM manipulation that's happening like D3.js, which looked like an improvement on performance after prototyping
- WebGL is made for this kind of thing
Besides, why not learn something new? So I decided to go down this route in the end.
THREE.js?
After going through this tutorial on MDN and some other tutorials that followed, I was surprised at how much is involved with 3D rendering - scenes, cameras, shaders, matrix math, vertices, etc.
It seemed pretty daunting.
All I really needed was some 2D objects (the windows) traveling in 3D space. What's the simplest way I can do that without having to get into the internals too much?
Then I ran into THREE.js. After following a simple cube tutorial (that site is a great resource, by the way), I iterated over the sample code until I ended up with with something close enough.
Implementation
After plenty of trial-and-error, I realized a some things that I'd like to share.
Windows Logo 3D Model?
At first I wondered if I should do a 3D model of the Windows 3.1 logo. However, doing that 3D model was way too much work. Instead, I went with using a picture as a material on one of the faces of the box.
However, how do I color each flying window correctly? Windows 3.1 had 256 colors and I found a set of 256 hex colors that I used to work with. I could make 256 versions of the same images, just applying different colors, but now we're looking at loading 256 images for this simple project.
After working with materials in THREE.js, I realized that if you put an image on a face of a material AND apply a color, the two get blended together. While this could work in theory, in practice it turned out to be pretty resource intensive because I had to load the image for each color I wanted to render. This turned out to have poorer performance than I expected.
Instead, I took one Windows logo image, and I made the logo part transparent, and the rest of the image black.

The thinking here is that we would place the transparent image onto the front face of a very thin box which allows you to see inside the shape. We make all of the outside sides black except for the inside wall that faces the camera. That side will get a random color of the 256 palette we have. After each window passes the camera, we just reset the hex color of the window before repositioning it and we don't have to create more material objects than we need.
As far as how many material objects that need to be created, we can reuse the same logo material on all of the boxes we create and reuse the black material object, reducing resources and improving performance. So, each box would use the same "logo" material object and then get one more material object, which was a random color selected from the 256 colors we can choose from. If we have, say, 40 flying windows, we only needed 42 material objects (one transparent logo, one black material, and 40 color materials). If we used the other method where we put the logo on top of a colored face, we would end up with 81 material objects (40 logo images with color, and the black material).
Here's a pen to help illustrate:
I placed the image on the camera-facing side, letting you see into the box. Since the background is black, the other outside sides (and insides) of the box are colored black as well, except for the inside side that is facing the camera. That part I made red and since the box is so thin it appears to be a 2D object. I'm rotating the box until it shows you the back of the box, so you can see how flat it looks.
Randomly Positioning the Windows
When the app loads, it places a configurable amount of windows onto the 3D canvas in different x, y, and z coordinates. I picked an arbitrary distance away from the camera and I also push the (x,y) coordinates slightly off center to avoid having a flying window go right through the camera. This makes it easier to code rather than figuring out how to "push" or "repel" the flying window away from the camera as it gets closer to the camera like the original screensaver does.
I set up the code so I can reuse it to reposition the flying window after it goes past the camera and out of view.
Moving All of the Windows
I spent some time figuring out how to move all of the flying windows for the animation effect. My first instince was to iterate through all of the windows and adjust its z-axis the same amount over each animation frame. However, since all of the windows are moving at the same speed, I realized that we could just move the camera and let the internals of WebGL do the work. This was way easier to implement.
So, for each animation frame, we can simply adjust the camera's z position. We still iterate over each window, but only to check if the window is behind the camera and, if so, randomly assign a new (x,y) position and push its z position all the way to the back again. This also helps reduce the work needing to be done by destroying and recreating a new window.
Z-Fighting
So, we've got the windows randomly position and we have the camera moving forward. We're done here, right?
Nope. Enter Z-Fighting.
When the windows would fly by the screen, I noticed that some of the edges of the windows would flicker a bit. And it was more noticeable with lighter colors than darker ones.
Here's a quick video of what I'm talking about. I intentionally slowed down the speed to see it better:
Notice that flicker on the window? This wouldn't happen very often, but it was bugging me, so I wanted to fix it. Apparently, this is what happens when you have two edges "fighting" to be seen when they touch edges and the camera moves. (It's more complicated than that, but let's simplifying it - this post is long enough.) Here, the inside color of white is fighting with the outside black color on the edges.
After some research, what I did to help this was make use of polygonOffset, where we can adjust the depth of certain sides:
const blackMaterial = new THREE.MeshBasicMaterial({
  color: 0x000000,
  side: THREE.DoubleSide,
  polygonOffset: true,
  polygonOffsetFactor: -1,
  polygonOffsetUnits: 1,
});
Result
Finally, putting this all together, here's the result: